Step by step instructions on how to configure Dynamic Services and start managing your domain authentication settings inside OnDMARC.
Dynamic Services (formerly Dynamic DMARC) provides you with the ability to manage your SPF, DKIM, DMARC, and MTA-STS records from within OnDMARC.
For more information on what Dynamic Services is and what it solves, check out the article below.
The purpose of this article is to show you how to enable and configure Dynamic Services correctly for SPF, DKIM, DMARC and MTA-STS management.
1. Enabling Dynamic Services
When you log into OnDMARC, navigate to Dynamic Services on the left of your screen and click on Configure Dynamic Services as shown below.

This will automatically enable the Dynamic Services tabs for the various protocols.
2. Configuring Dynamic SPF, DKIM, DMARC and MTA-STS
We'll go through configuring each of the email security protocols via Dynamic Services. You may skip a section if you don't want to delegate DKIM or DMARC to us. We'll also go through setting up MTA-STS and TLS-RPT and hosting your policy with OnDMARC.
2.1 Configure Dynamic SPF
Now that Dynamic Services is fully enabled, it's time to start populating all tabs with the required records.
On the SPF tab, make sure that any existing SPF mechanisms that you have in your current SPF record are added to Dynamic SPF.
For example, if your current SPF record in your DNS is as follows:
v=spf1 include:_spf.salesforce.com include:spf.protection.outlook.com ip4:12.13.14.15 ~all
You will have to make sure that you add those SPF mechanisms (two include mechanisms, and one IPv4 address) to Dynamic SPF as follows:
The two includes are added under the Managed Includes section.

And the IP address is added under the Managed IPv4 Addresses section.

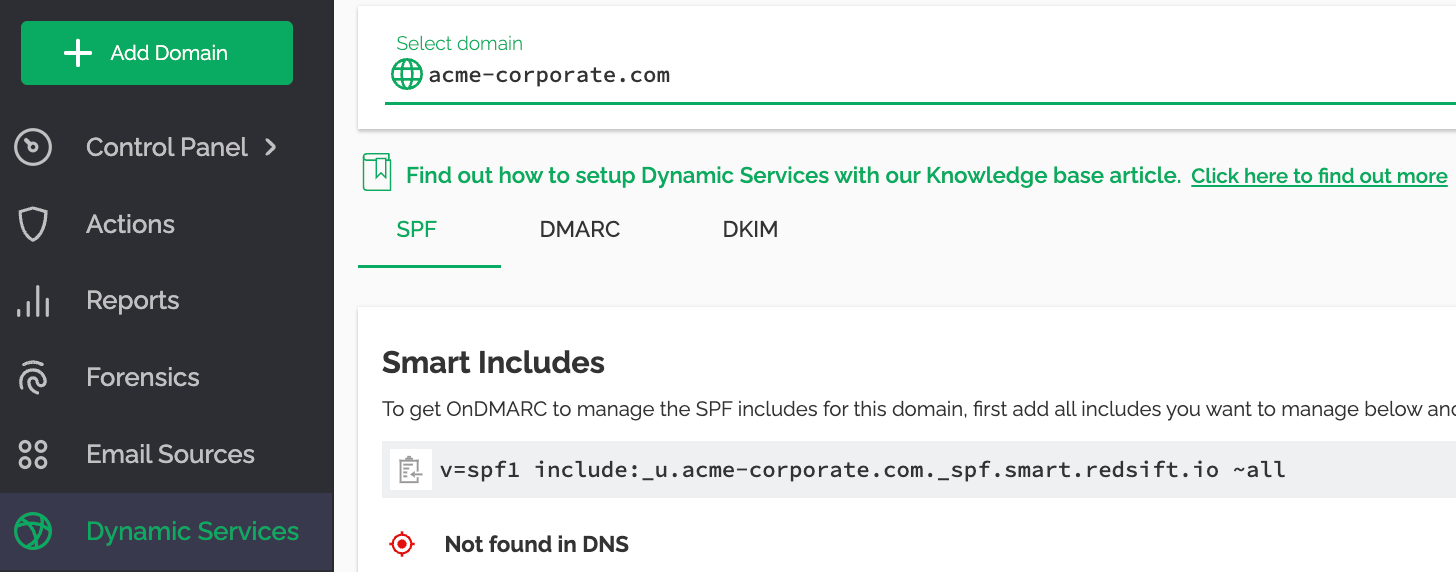
Now that Dynamic SPF is ready and contains all the required values, you are ready to make the change in your DNS and switch over to using Dynamic SPF.
Edit your SPF record to contain the Smart Include that was generated in your account.
You can see the Smart Include generated for our example domain is:
v=spf1 include:_u.acme-corporate.com._spf.smart.ondmarc.com ~all
We should now change our SPF record to look like it:
v=spf1 include:_u.acme-corporate.com._spf.smart.ondmarc.com ~all
Make sure that you completely replace the existing SPF record, as having two records will cause deliverability errors.
From that moment on, OnDMARC will be managing your SPF record and any future changes will have to be done in Dynamic SPF.
2.2 Configuring Dynamic DKIM
Before starting: Make sure your DNS provider supports NS delegation for subdomains. You will not be able to use Dynamic DKIM if your provider does not support NS delegation for subdomains.
The idea behind populating Dynamic DKIM is the same as SPF. You will have to make sure that any existing DKIM records that you have in your DNS are created in Dynamic DKIM in advance, before delegating management of those keys to OnDMARC.
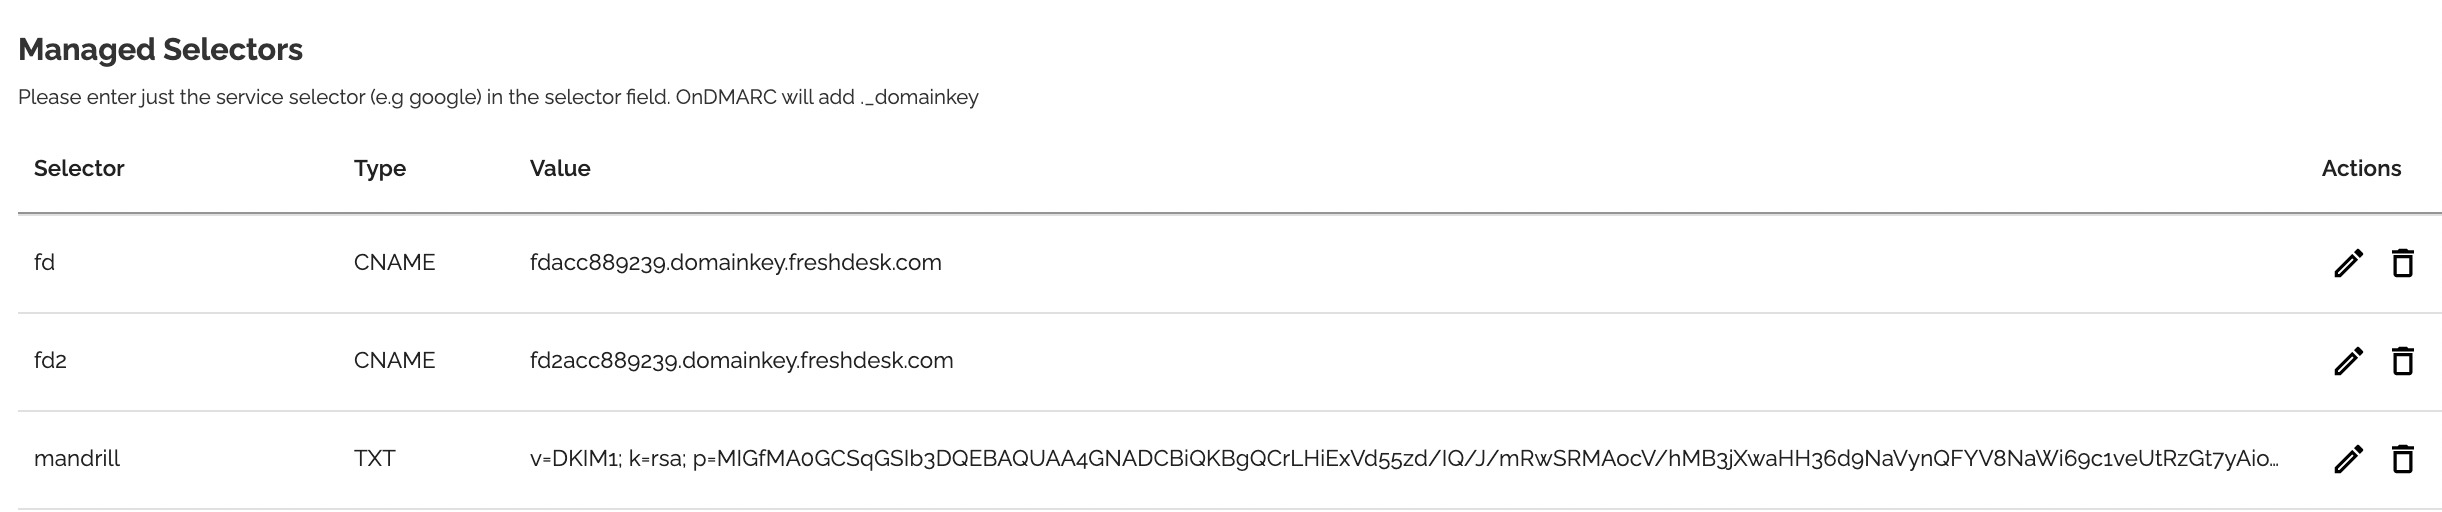
For example, if in your DNS you have the following three DKIM records, one TXT and two CNAME records:
mandrill._domainkey TXT v=DKIM1; k=rsa; p=MIGfMA0GCSqGSIb3DQEBAQUAA4GNADCBiQKBgQCrLHiExVd55zd/IQ/J/mRwSRMAocV/hMB3jXwaHH36d9NaVynQFYV8NaWi69c1veUtRzGt7yAioXqLj7Z4TeEUoOLgrKsn8YnckGs9i3B3tVFB+Ch/4mPhXWiNfNdynHWBcPcbJ8kjEQ2U8y78dHZj1YeRXXVvWob2OaKynO8/AKSLQIaA
fd._domainkey CNAME fdacc889239.domainkey.freshdesk.com
fd._domainkey CNAME fda2cc889239.domainkey.freshdesk.com
In Dynamic DKIM, you will have to create the above keys as follows:
Important note: Enter just the service selector (e.g google) in the selector field. OnDMARC will add ._domainkey for you automatically
Now that Dynamic DKIM contains all the required values, you are ready to delegate management of DKIM to OnDMARC by creating a NS delegation record for the subdomain in your DNS provider. The record generated can be found under the Dynamic DKIM tab as shown below.

Once that record has been created, any future DKIM keys for that domain have to be created in Dynamic DKIM.
2.3 Configuring Dynamic DMARC
Before starting: Make sure your DNS provider supports NS delegation for subdomains. You will not be able to use Dynamic DMARC if your provider does not support NS delegation for subdomains.
Setting up Dynamic DMARC is the easiest of the three. All you have to do is make sure the Dynamic DMARC Settings, as shown below, are exactly the same as your existing DMARC record (if you have one already) and then create the NS delegation record.
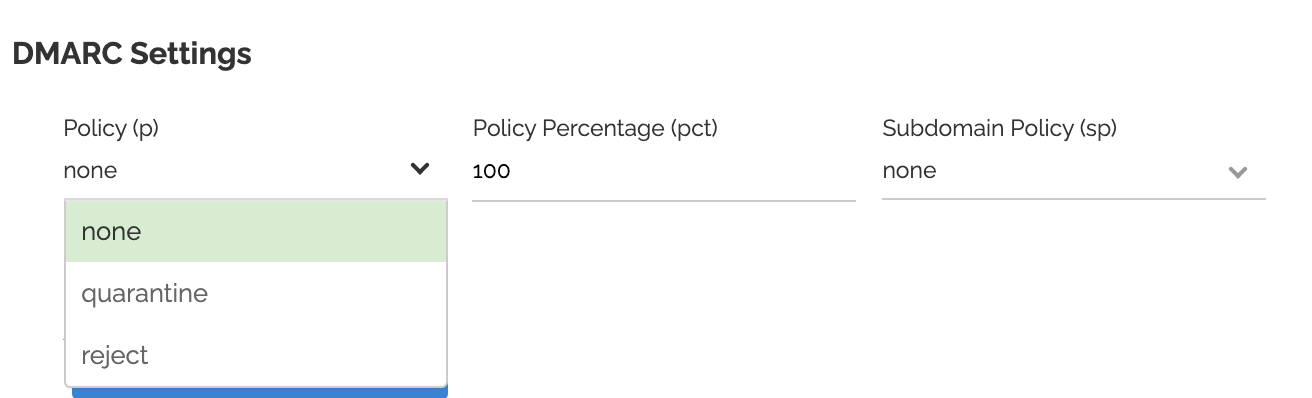
If your domain for example has a policy of reject, and a subdomain policy of reject, all you have to do is change the Settings from the drop-downs above accordingly.
Please note that you may not have a subdomain policy explicitly defined in your current DMARC record, since the subdomain policy follows the main policy. If your main policy is in reject, you should also put your subdomain policy in reject.
If you are unsure please contact a member of our Customer Success team or use the Live Chat.
Once Dynamic DMARC is correctly set, you are ready to delegate management of DMARC to OnDMARC by creating the NS record in your DNS. The record generated can be found under the Dynamic DMARC tab as shown below.

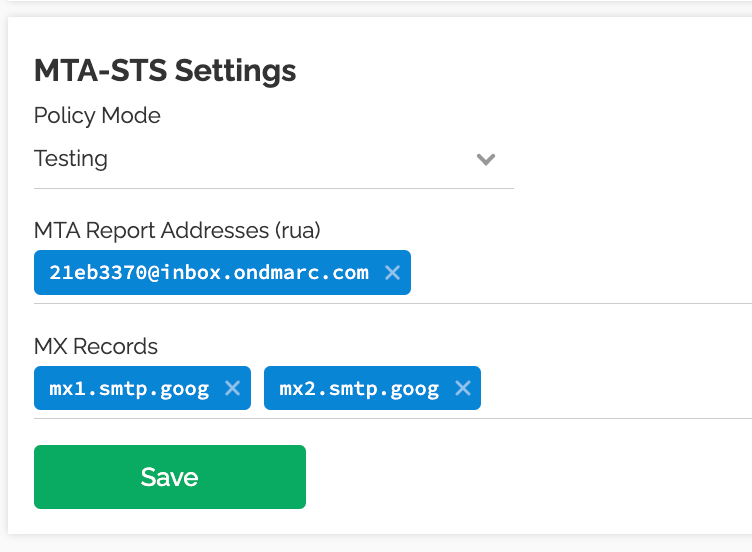
2.4 Configuring Dynamic MTA-STS
Before starting: Make sure your DNS provider supports NS delegation for subdomains. You will not be able to use Dynamic MTA-STS if your provider does not support NS delegation for subdomains.
Want to learn more before proceeding? Check out our collection on the topic!
On the MTA-STS tab, click the Generate Records button to create the needed records to setup your policies.

Once the platform has generated the needed records, it will display them and you will need to add them to your DNS provider. Once you've added them, click the green Check DNS button. Keep in mind it make take several hours for the records to be picked up and visible by our resolvers.
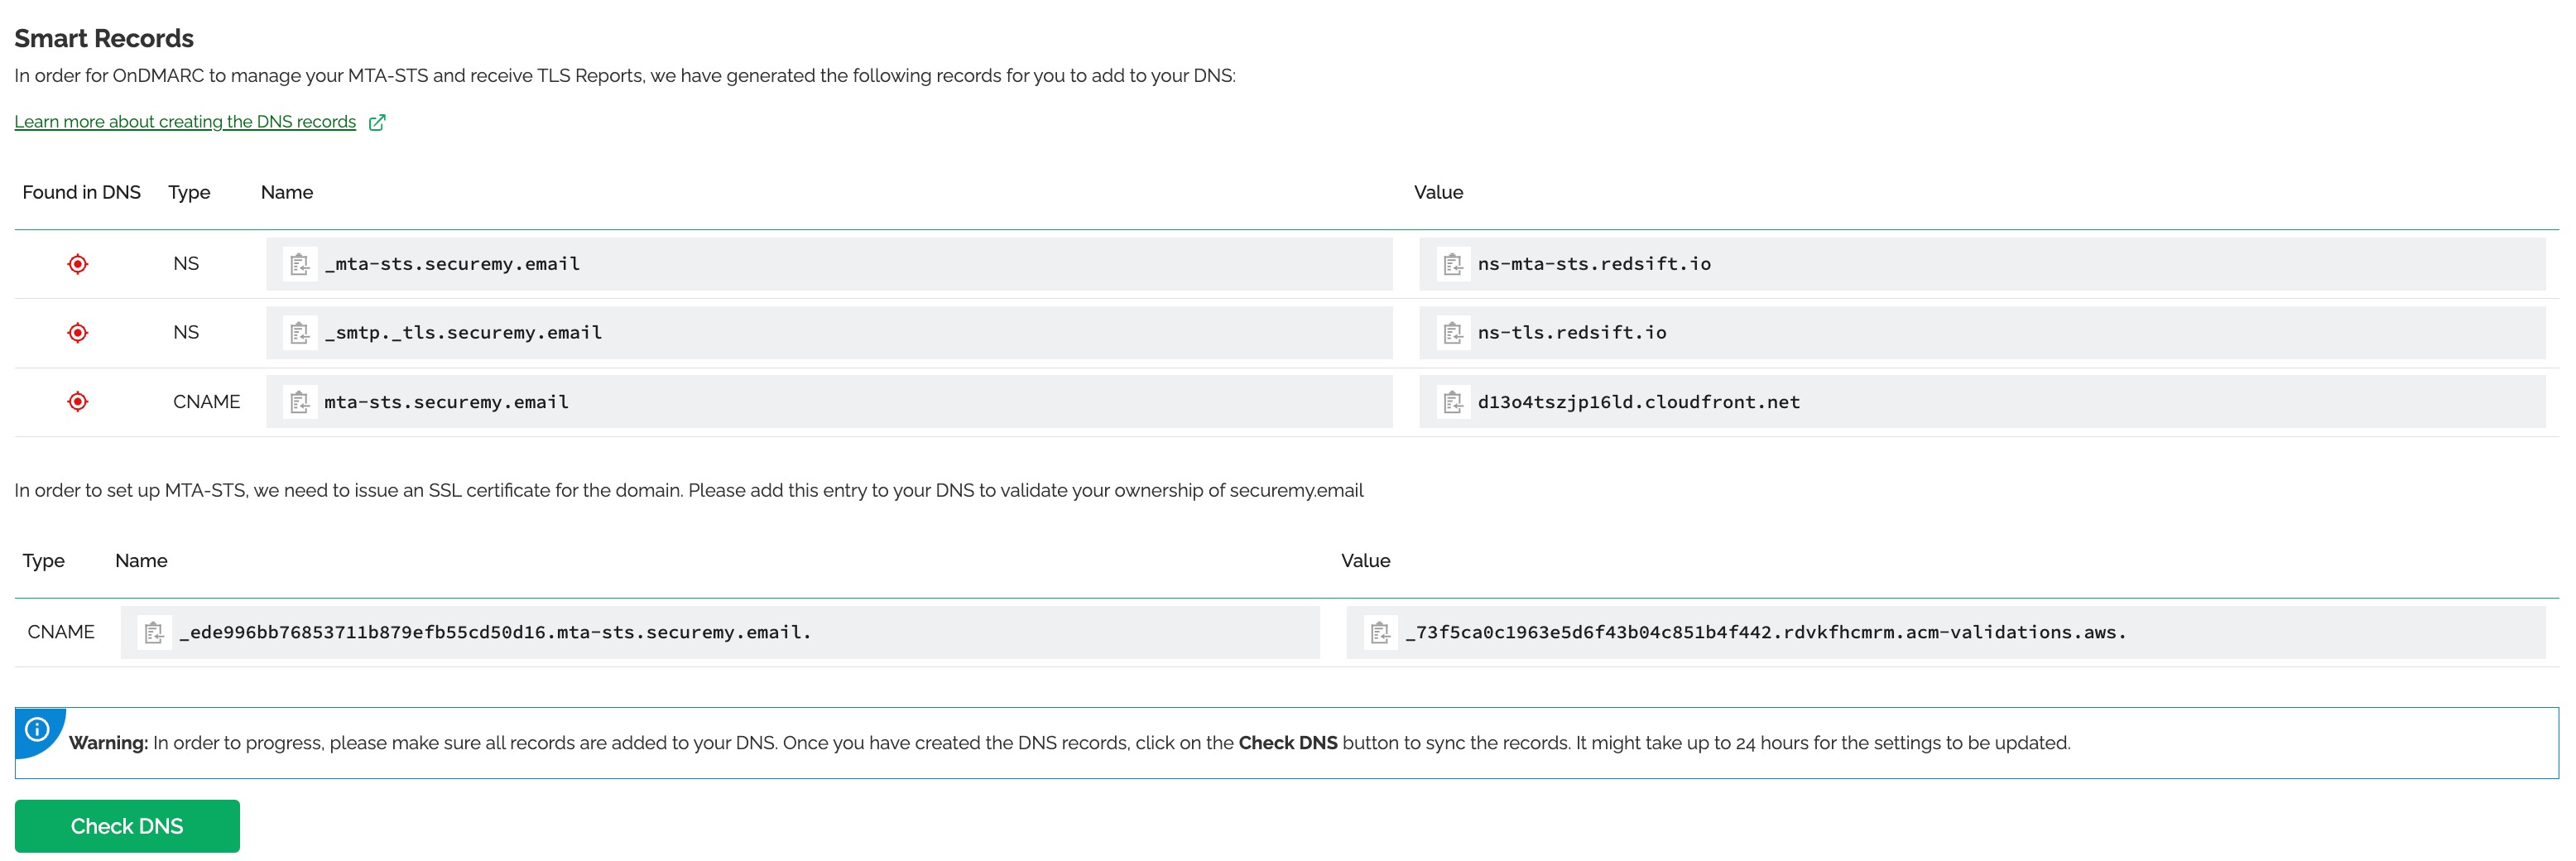
Once the DNS records have been found in the DNS, you will be able to edit your policy. We've already pre-added your reporting address (the same as your DMARC reporting address) and fetched your MX records.
We recommend keeping your policy in testing mode for at least a month so you can see the reports and fix any issues in the unlikely event of any failures.
You now have MTA-STS and TLS-RPT correctly setup. As with DMARC reports, you will start getting reports of incoming emails in the next 48 hours from capable senders. You can see these reports in the new TLS Reports section of the left sidebar.
You should rarely, if any, see any failures. But if you do, you will be able to see in the reports the cause of the failure so you can take action
Note: Not all DNS providers allow the delegation of subdomains (DKIM and DMARC) using NS records. That's a limitation with some DNS providers. If you encounter this issue, you won't be able to delegate management of those records for your domain.